

KnowHow
Free Technical Resources
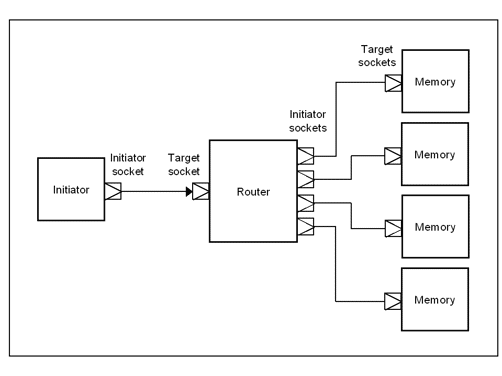
This third tutorial of the series builds on the example used in the first two tutorials, so it is a good idea to work through those first, particularly if you are new to TLM-2. This time, we look at propagating transactions through an interconnect component representing a router placed between the initiator and several target memories. The router has to forward transport, DMI and debug transactions to the target, and it also has to manage the return path as the function calls unwind and transactions are returned to the initiator. We have to deal with two issues: how to model an interconnect component that has a single target socket but multiple initiator sockets, and how to handle the addresses in the transactions as they pass forward and backward through the router.
The initiator and the target memory as very similar to the example in Tutorial 2, but now we add a router between them, modeled as a TLM-2 interconnect component, that is, a component that forwards transactions from an incoming target socket to an outgoing initiator socket. In this case there are four outgoing initiator sockets connected to four instances of the memory.
Here is the top-level module, showing how the module hierarchy is connected up:
SC_MODULE(Top)
{
  Initiator* initiator;
  Router<4>* router;
  Memory*    memory[4];

  SC_CTOR(Top)
  {
    initiator = new Initiator("initiator");
    router    = new Router<4>("router");
    for (int i = 0; i < 4; i++)
    {
      char txt[20];
      sprintf(txt, "memory_%d", i);
      memory[i]   = new Memory(txt);
    }

    initiator->socket.bind( router->target_socket );
    for (int i = 0; i < 4; i++)
      router->initiator_socket[i]->bind( memory[i]->socket );
  }
};
You can see that the socket belonging to the initiator is bound to the single target socket of the router, and each of the four initiator sockets belonging to the router is bound to a socket belonging to a different target memory. Each initiator-to-target socket connection is point-to-point. You cannot bind one initiator socket to multiple target sockets or vice versa. (Well, actually you can, but that requires the use of another kind of convenience socket, the multi-passthrough socket, that we will introduce in a later tutorial.)
The idea is that each memory sits at a different location in the address space used by the initiator, so the router must route transactions through to the appropriate memory depending on the address embedded in the transaction, translating the address to local address for each memory as it does so. This same principle of address translation will apply to transport, DMI and debug transactions.
The router contains a single instance of the simple target socket for the blocking transport interface, and an array of simple initiator sockets, again to support the blocking transport interface:
template<unsigned int N_TARGETS>
struct Router: sc_module
{
  tlm_utils::simple_target_socket<Router>
                                        target_socket;
  tlm_utils::simple_initiator_socket_tagged<Router>
                                        initiator_socket[N_TARGETS];
  ...
};
Notice that the number of targets is specified using a template argument. All of the sockets default to being 32 bits wide and to using the base protocol. This router is only able to route generic payload transactions, although those transactions could include extensions. Also notice that the initiator sockets are of type simple_initiator_socket_tagged. A tagged socket allows a component to determine through which socket an incoming method call has arrived, necessary in this case because there are multiple initiator sockets. Here is the router constructor:
SC_CTOR(Router)
: target_socket("target_socket")
{
  target_socket.register_b_transport(    this, &Router::b_transport);
  target_socket.register_get_direct_mem_ptr(
                                         this, &Router::get_direct_mem_ptr);
  target_socket.register_transport_dbg(  this, &Router::transport_dbg);

  for (unsigned int i = 0; i < N_TARGETS; i++)
  {
    char txt[20];
    sprintf(txt, "socket_%d", i);
    initiator_socket[i] =
        new tlm_utils::simple_initiator_socket_tagged<Router>(txt);

    initiator_socket[i]->register_invalidate_direct_mem_ptr(
        this, &Router::invalidate_direct_mem_ptr, i);
  }
}
The implementation of each interface method is registered with the appropriate socket, either the target socket or one of the array of initiator sockets. Notice the final argument to the registration method for the initiator socket, an integer tag. This tag is passed as an argument to the invalidate_direct_mem_ptr method when it is called back. We will look in turn at the blocking transport interface, the direct memory interface, and the debug transaction interface.
The blocking transport method is only passed in the forward direction, so we do not have to worry about handling b_transport calls coming back from the target. Here is the complete implementation of b_transport in the router:
virtual void b_transport( tlm::tlm_generic_payload& trans, sc_time& delay )
{
  sc_dt::uint64 address = trans.get_address();
  sc_dt::uint64 masked_address;
  unsigned int target_nr = decode_address( address, masked_address);

  trans.set_address( masked_address );

  ( *initiator_socket[target_nr] )->b_transport( trans, delay );
}
The router has to inspect the address attribute to determine which socket to send the transaction out through, which it puts into the variable target_nr. This example uses very simple built-in address decoding, as defined by the following functions:
inline unsigned int decode_address( sc_dt::uint64 address,
                                    sc_dt::uint64& masked_address )
{
  unsigned int target_nr = static_cast<unsigned int>( (address >> 8) & 0x3 );
  masked_address = address & 0xFF;
  return target_nr;
}

inline sc_dt::uint64 compose_address( unsigned int target_nr,
                                      sc_dt::uint64 address)
{
  return (target_nr << 8) | (address & 0xFF);
}
The router overwrites the address attribute of the generic payload transaction with the masked address, that is, the local address within the target memory. The address attribute is one of the very few attributes that an interconnect component is permitted to modify, the others being the DMI hint and the extensions. The interconnect and the target are obliged to treat most generic payload attributes as readonly.
The final act of b_transport is to forward the transaction through the appropriate initiator socket. Note that the b_transport method of the target module will execute in the context of a thread process in the initiator module, and when that method returns, control gets unwound through the whole call chain back to the initiator.
The important principle when routing DMI and debug transactions is to use exactly the same address transformations as for the transport interface, and to use those transformations in both forward and backward directions where necessary. We will see how this works, starting with the forward DMI interface:
virtual bool get_direct_mem_ptr(tlm::tlm_generic_payload& trans,
                                tlm::tlm_dmi& dmi_data)
{
  sc_dt::uint64 masked_address;
  unsigned int target_nr = decode_address( trans.get_address(),
                                           masked_address );
  trans.set_address( masked_address );

  bool status = ( *initiator_socket[target_nr] )->
                   get_direct_mem_ptr( trans, dmi_data );
  ...
The code is similar to the implementation of b_transport above. The DMI address being requested is translated into the address space of the target before the transaction is routed on to the appropriate target.
The target responds to the DMI request by returning a DMI data object containing an address range, which also needs to be translated back into the address space known by the initiator:
  dmi_data.set_start_address(
    compose_address( target_nr, dmi_data.get_start_address() ));
  dmi_data.set_end_address  (
    compose_address( target_nr, dmi_data.get_end_address() ));

  return status;
}
The start and end addresses are embedded within the DMI data object, and are overwritten. The critical point here is to use the inverse address transformation to that used on the forward path. Exactly the same applies on the backward path when a target wishes to invalidate a DMI pointer:
virtual void invalidate_direct_mem_ptr(int id,
                                       sc_dt::uint64 start_range,
                                       sc_dt::uint64 end_range)
{
  sc_dt::uint64 bw_start_range = compose_address( id, start_range );
  sc_dt::uint64 bw_end_range   = compose_address( id, end_range );
  target_socket->invalidate_direct_mem_ptr(bw_start_range, bw_end_range);
}
This implementation of invalidate_direct_mem_ptr is an example of a callback from a tagged socket. The socket adds the int id argument to distinguish between incoming method calls through different sockets. Since we chose the id to be the same as the target number, the method is able to perform the inverse address translation.
Finally, let’s look at routing the debug transport method. This should seem very familiar by now, because the implementation is similar to the preceding methods:
virtual unsigned int transport_dbg(tlm::tlm_generic_payload& trans)
{
  sc_dt::uint64 masked_address;
  unsigned int target_nr = decode_address( trans.get_address(),
                                           masked_address );
  trans.set_address( masked_address );

  return ( *initiator_socket[target_nr] )->transport_dbg( trans );
}
This time, the address to be translated is buried in the debug payload. The target will execute the debug transaction by copying a block of data to or from the given address, and the return value from transport_dbg gives the number of bytes actually copied.
That concludes this tutorial. We have focussed on how transactions can be routed through an interconnect component, and in particular how the component performs address translation. In general a transaction can be routed through any number of interconnect components. We will show a more sophisticated bus model in a later tutorial.
You will find the source code for this example in file tlm2_getting_started_3.cpp.
Run this example in EDA Playground
Click here to download both the source file for this example and this page in PDF format. In exchange, we will ask you to enter some personal details. To read about how we use your details, click here. On the registration form, you will be asked whether you want us to send you further information concerning other Doulos products and services in the subject area concerned.
Previous: Tutorial 2 Next: Example 4
Back to the full list of TLM-2.0 Tutorials