Lexical Guidelines and Naming Conventions
General Guidelines
General Code Structure
Clocks, Timing, Synchronization, and Interfaces
Split Transactors for Emulation/Acceleration
Transactions
Sequences
Stimulus and Phasing
Objections
Components
Connection to the DUT
TLM Connections
Configurations [UPDATED]
The Factory
Tests
Messaging
Register Layer
Functional Coverage
Lexical Guidelines and Naming Conventions
| ☐ Have only one declaration or statement per line. |
As well as helping with readability, this helps ensure the smooth operation of any tools that need to make reference to the source code, such as the annotation of compiler error messages or code coverage information and source code debug. Having declarations on separate lines makes commenting easier. Having a comma-separated list of related names in a declaration may be okay, but including variable initializations in a comma-separated list should be avoided.
| ☐ When creating user-defined names for SystemVerilog variables and classes, use lower-case words separated by underscores (as opposed to camelBackStyle). |
Although this convention is not critical, it does help to be consistent, and this recommendation is consistent with the UVM base class library itself.
| ☐ When creating user-defined names for SystemVerilog enum literals, constants, and parameters, use upper-case words separated by underscores. |
Again this is not critical but is consistent with the UVM base class library.
| ☐ Restrict all user-defined UVM instance names (that is, strings such as component instance names) to the character set a-z, A-Z, 0-9 and _ (underscore). |
Keep in mind that the use of other punctuation characters or symbols may make names hard to interpret in the context of software user interfaces or automatically generated reports. The characters $ and __ (double underscore) are notorious for breaking downstream tools.
| ☐ Use shorter names for local variables and longer, more descriptive names for global items such as class names and package names. |
This is just good programming style.
| ☐ Use the prefix m_ before the names of user-defined class member variables (officially known as class properties in SystemVerilog). |
The motivation for the prefix m_ is to distinguish class member variables from function arguments and local block scope variables when referenced from within the methods of a class, and to distinguish class member variables from methods when referenced from outside the class. The prefix m_ is only used with class member variables, not variables declared inside blocks or methods, because the scope of block variables is anyway restricted to the block or method in which they are declared. Do not use the prefix m_ with ports, exports, or virtual interfaces, which are anyway distinguished by having their own naming conventions. There are also a number of special variables named in the UVM documentation that do not have the m_ prefix, i.e. is_active, coverage_enable, checks_enable, and regmodel.
| ☐ Use the names m_sequencer, m_driver, and m_monitor as the instance names of the sequencer, driver, and monitor respectively within every agent. |
Fixed names are sufficient since each agent has exactly one sequencer, driver, and monitor.
| ☐ Use the suffixes _env and _agent after the instance names of every env and agent, respectively. |
When there are multiple envs or agents instantiated at the same level, each will need to be given a unique instance name, e.g. m_amba3_agent versus m_pcie_agent.
| ☐ Use the name m_config as the instance name of the configuration object within any component or sequence that has one. |
| ☐ Use the suffix _config after user-defined configuration class names. |
When configuration objects are referenced from the configuration database, the configuration database field name should be "config".
| ☐ Use the suffix _port after user-defined port names. |
| ☐ Use the suffix _export after user-defined export names. |
Port and export names do not need the prefix m_ since ports and exports are invariably class member variables.
| ☐ Use the suffix _vif after user-defined virtual interface names. |
If there is only one virtual interface in a component it is permissible to use the name vif rather than adding _vif as a suffix to another name.
| ☐ Use the suffix _t after user-defined type definitions introduced using the keyword typedef. |
A forward typedef to a class is an exception, because it will always refer to the class name. The motivation for the suffix _t is to distinguish typedefs from class names when the name is used to define variables or function arguments within a class (it tells you where to start looking for the type definition) and to distinguish typedefs from class member variables and methods when accessed from outside the class. Do not add the suffix _t to class names. It is usually possible to distinguish UVM class names from other names in the context in which they are typically used, e.g. my_agent m_agent, where the prefix m_ distinguishes the variable name from the type name.
| ☐ Use the suffix _pkg after user-defined package names. |
See Example.
| ☐ Write comments wherever they add value to the source code and help the reader to understand the purpose of the code. |
Do not write comments that merely repeat the code itself or are otherwise unnecessary, because unnecessary comments will increase the cost of maintaining the code.
| ☐ Include white space (blank lines, indentation) wherever it helps to make the code more readable. |
Code with little or no white space can be difficult to scan.
| ☐ When overriding built-in UVM virtual methods, do not insert the virtual keyword at the start of the overridden method definition. |
Doing so has no effect on the semantics but clutters the text. This refers in particular to the UVM common phase and UVM runtime phase methods (build_phase etc) and the user-definable hooks of uvm_object (do_copy etc).
General Guidelines
| ☐ Do not use any features of UVM that are specifically marked as deprecated in the UVM Class Reference or base class library. |
| ☐ Do not use internal features of the UVM base class library code that are not documented in the UVM Class Reference. |
The UVM Class Reference is the definitive standard, not the source code. For example, do not refer to any variables declared in the UVM class library that have the m_ prefix, because these variables are not part of the standard.
General Code Structure
| ☐ In structuring and coding the verification environment, think primarily about reuse. |
One of the primary purposes of UVM is to make verification components, verification environments, and test stimulus reusable, so always think about the separation of concerns. Avoid introducing any dependencies that would impede subsequent reuse. Every agent should be written with reuse in mind, such that it can be instantiated in any verification environment with minimal constraints.
| ☐ Use a consistent file structure and a consistent file naming convention throughout. |
Most files should contain a single module, interface, package, or class, in which case the file name should match the name of the item defined in the file and should have the file name extension .sv. (See the Code Generator).
| ☐ Each class should be defined within a package (as opposed to defining classes within modules or at file scope). |
You can have more than one package, and more than one class within each package. The same class name can be used in more than one package, in which case each occurrence would define a distinct class.
| ☐ Use `include directives within a package to allow each class to be placed in a separate file. |
As opposed to having all the classes in one very large package file.
| ☐ Use conditional compilation guards to avoid compiling the same include file more than once. |
Example:
`ifndef BUS_PKG_SV
`define BUS_PKG_SV
...
`endif // BUS_PKG_SV
| ☐ Do not use wildcard import at compilation unit scope. |
That is, do not write import declarations such as import my_package::*; outside of any module or package, because doing so would make any imported names visible across all modules and packages in the file, thus defeating the purpose of using packages to restrict the scope of names. This advice applies to all import declarations at compilation unit scope, not just wildcard imports, but wildcard imports are the most damaging.
| ☐ Include uvm_macros.svh and import uvm_pkg::* inside each package or module that refers to the UVM base class library |
As opposed to including/importing names at file scope.
Example:
`ifndef BUS_PKG_SV
`define BUS_PKG_SV

package bus_pkg;
  `include "uvm_macros.svh"
  import uvm_pkg::*;

  `include "bus_tx.sv"
  `include "bus_config.sv"
  `include "bus_driver.sv"
  `include "bus_monitor.sv"
  `include "bus_sequencer.sv"
  `include "bus_agent.sv"
  `include "bus_coverage.sv"
  `include "bus_seq_lib.sv"
endpackage

`endif // BUS_PKG_SV
| ☐ Use one agent per interface, with a passive monitor and optional sequencer and driver whose existence is determined by the value of the get_is_active method of class uvm_agent. |
Since a DUT will typically have multiple interfaces, this implies having multiple UVM agents organised as a parallel structure. (For a discussion and example of get_is_active, see Configurations.)
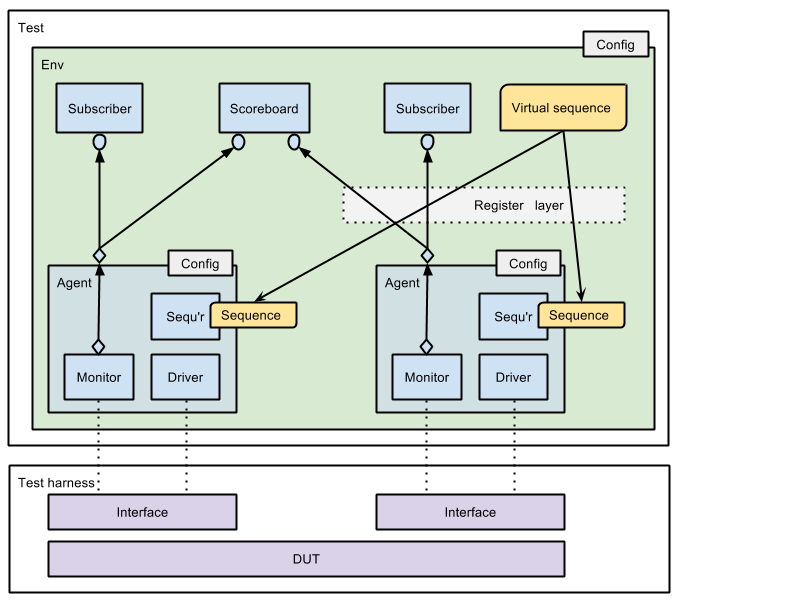
Figure: The organisation of the verification environment
| ☐ An agent should not instantiate components other than the canonical agent structure of one sequencer, one driver, and one monitor. |
An agent could instantiate further components where demanded by the application, but this should be avoided in general. Each agent will typically have an associated configuration object, but that object should be instantiated by an enclosing env, not by the agent itself (see Configurations).
In the case that the DUT has multiple similar interfaces (for example, multiple ports on a network router), multiple instances of the same agent may be grouped together within another UVM component to form a component hierarchy. A nested hierarchy of verification environments may arise as verification environments are reused from the block level to the system level.
| ☐ Use virtual sequences to co-ordinate the stimulus generation activities of multiple parallel agents. |
That is, use virtual sequences to start sequences on the sequencers belonging to multiple agents. Virtual sequences may be reused between tests, which is a useful mechanism for stimulus reuse. Avoid using the "default_sequence" configuration parameter as a way to start sequences. In general, you should start a sequence by calling its start method. UVM 1.2 recommends using the class uvm_sequence_library if you want to start sequences at the beginning of a phase.
| ☐ Checking and functional coverage collection should be performed in checkers, scoreboards, coverage collectors, and other ad hoc subscriber components that are instantiated external to any agent and connected to the analysis port of the monitor. |
In general, checking and functional coverage collection should not be performed in the agent itself, which should remain protocol-specific but DUT-agnostic, and should not be performed in the sequence that generates the stimulus. In some cases an agent can be made more reusable by getting certain of its parameters from the configuration database. In any case the agent should only contain checking and coverage collection code that is intrinsic to the protocol and would be reusable whenever the agent was reused between tests or between verification environments. In order to maximize the reusability of an agent, you should try to anticipate the configuration changes that may be necessary to support future versions of an interface.
| ☐ In general, connect agents, checkers, scoreboards, and coverage collectors using analysis ports and exports. |
A monitor or agent should only send transactions to the rest of the verification environment using outgoing analysis ports. A driver should be restricted to communicating with one sequencer and one SystemVerilog interface and should not need analysis ports. A scoreboard can consolidate the output from multiple parallel agents. Analysis ports reduce the coupling between components. In general, avoid having direct object references between components. There are some places where a direct reference to another component is acceptable, such as where a virtual sequence makes a direct reference to a sequencer within an agent in order to start a child sequence.
| ☐ UVM envs should be written such that they can be used as top-level envs or reused as sub-envs in other larger verification environments. |
IP reuse leads to VIP reuse, so a UVM env from one project may be reused as a sub-component in the next larger project, resulting in a hierarchy of UVM components including embedded agents, scoreboards and other analysis components.
| ☐ Use factory overrides and/or the configuration database to adapt the behavior of repurposed UVM components to the needs of a new verification environment. |
Avoid modifying the re-purposed code itself. The configuration database should be used where the parameterization requirements for a component can be anticipated in advance when the component is first written and thus built into the component by getting parameters from the configuration database. Factory overrides can be used to make unanticipated changes, but can be a blunt instrument since they result in the wholesale replacement of objects or methods.
| ☐ A top-level module should set configuration parameters that are retrieved by the test, the test should set parameters retrieved by the env, and the env should set parameters retrieved by lower-level envs or agents. |
In order to decouple tests from verification components for the sake of reusability, a top-level module or test should not contain the hierarchical instance names of components that are embedded deep in the verification environment, nor should a top-level module or test share configuration parameter names with leaf-level UVM components. This is a judgement to be made according to the desired level of reuse. For example, an agent should not get a virtual interface from the configuration database that was set directly by the top-level module, because doing so would introduce a dependency between the top-level module and the agent that may impede reuse. (See Configurations.)
| ☐ Represent layered protocols by having multiple sequencers, each with their own transaction type. |
Protocol layering may lead to the need to layer existing UVM agents. Create a layered structure of agents where potentially different transaction types pass between each layer. Use factory overrides and/or the configuration database to stub out existing unwanted code within each agent, and run new protocol translation sequences or pass-through sequences on the sequencers within the agents to pass transactions up and down the protocol stack. (See Layered Protocols and Layered Agents.)
Clocks, Timing, Synchronization, and Interfaces
| ☐ Generate clocks and resets in a SystemVerilog module, never in the UVM class-based verification environment and never in a SystemVerilog program. |
Otherwise the SystemVerilog scheduler could give incorrect behavior.
| ☐ Use SystemVerilog modules in preference to SystemVerilog programs. |
The role of the program in isolating the verification environment from SystemVerilog scheduling issues in the DUT can be performed equally well by the clocking block. The only case a program might be convenient is when dealing with asynchronous assertions.
| ☐ Use clocking blocks within a SystemVerilog interface in order to sense and drive a synchronous DUT interface. |
SystemVerilog clocking blocks should be used because they provide a good way to isolate the verification environment from the gate-level timing and the uncertainties of the SystemVerilog scheduler. Not using clocking blocks might be justified if the driving and sampling of DUT pins can be synchronized adequately using procedural code, particularly if the DUT is modeled using straightforward RTL code, and always provided that stimulus is generated from a SystemVerilog module and not a program. (VHDL users sometimes manage without clocking blocks because they are accustomed to taking a more disciplined approach to delta cycles anyway.) Also note that clocking blocks must be bypassed when accessing asynchronous pins (see immediately below).
| ☐ Use modports to enforce the use of clocking blocks where those clocking blocks are accessed through a virtual interface from the UVM verification environment. |
modports can also enforce the use of clocking blocks in an interface where that interface is accessed through an interface port.
| ☐ Use modports that combine a clocking block with asynchronous signals in order to access an interface that combines synchronous and asynchronous signals. |
Clocking blocks cannot be used to sense and drive signals asynchronously, but combining asynchronous signals with a clocking block in a modport provides a good way to highlight what is going on.
| ☐ In the verification environment, try where possible to confine synchronization to signals in the DUT interface and explicit delays to drivers and monitors, with other UVM components being untimed. |
The driver and monitor components should be synchronized to the DUT interface, which implies that these components will need to wait on signal changes in the interface. Because of this, UVM components or sequences that provide transactions to the driver should provide transaction-level ports and exports that do not block the execution of the driver so that the driver is always able to react immediately to signals in the DUT interface. (This applies whether making blocking or non-blocking method calls - blocking method calls do not actually need to block!) Note that sequences may still be blocking, but only in the sense that they block while waiting for the driver, not while waiting for external events. Also note that while a sequence should not model time by suspending its own execution for a given delay, a sequence may certainly model time by calculating delays and storing these delays in transactions that are then passed to the driver.
| ☐ If a driver needs to insert variable delays within or between transactions when driving the pins of an interface, this should be handled by storing delays in the transaction passed to the driver. |
Putting the delays in the transaction allows the sequence to take control of the timing when generating back-to-back transactions.
| ☐ A driver should pull transactions from a sequencer using the non-blocking try_* methods in order to maximize reusability in the scenario where the author cannot know whether the sequence will block the execution of the driver. |
If a sequence, running on a sequencer, does block the flow of transactions to its driver (because the sequence is waiting for some specific event elsewhere in the environment, for example), then calling the blocking get/get_next_item from the driver might cause the driver to miss critical signals on the interface.
Example:
class my_driver extends uvm_driver #(my_transaction);
  `uvm_component_utils(my_driver)

  virtual dut_if vif;
  ...

  task run_phase(uvm_phase phase);
    forever
    begin
      my_transaction tx = my_transaction::type_id::create("tx");
      seq_item_port.try_next_item(req);

      if (req != null)
      begin
        // Wiggle pins
        seq_item_port.item_done();
        @(posedge vif.clock);
        vif.en   <= 1;
        vif.cmd  <= req.m_cmd;
        vif.addr <= req.m_addr;
        vif.data <= req.m_data;
      end
      else
      begin
        // Insert an idle cycle
        @(posedge vif.clock);
        vif.en   <= 0;
        vif.cmd  <= 0;
        vif.addr <= 0;
        vif.data <= 0;
      end
    end
  endtask
endclass: my_driver
| ☐ A driver should only pull down transactions from the sequencer when it needs them. |
Having a driver pull down a set of transactions from the sequencer in advance will deny the sequencer immediate control over what happens next in the driver. It is better to for the driver to pull down transactions just-in-time. Doing so allows the sequence to set or randomize the transaction members using the current state of the verification environment.
| ☐ Use the uvm_event or uvm_barrier for ad hoc synchronization between sequences and/or analysis components such as scoreboards. |
When synchronizing parallel processes, sequences, or transaction streams that are distributed across multiple UVM components, UVM events or barriers may sometimes be a more convenient communication mechanism than ports and exports. An example would be where a sequence that is sending transactions to one DUT interface is waiting for a specific scenario to be observed on another DUT interface. Another example would be where several sequences are to run in lock step with one another but on different agents. The configuration database can be used to distribute the event or barrier object to multiple components. Alternatively, the event pool and barrier pool classes make it possible to manage multiple events or barriers without the need to instantiate and distribute the event or barrier objects themselves, but you still have the challenge of making sure that components that access the same event or barrier use the same key (string). If you use the configuration database to distribute the keys then the advantage of using the pools is lost: You might was well use the configuration database to distribute the event or barrier objects themselves (shown in the comment below).
Example:
class my_sequence1 extends uvm_sequence #(my_tx);
  ...
  task body;
    // Using a barrier pool to manage the barriers
    uvm_barrier_pool barrier_pool = uvm_barrier_pool::get_global_pool();
    uvm_barrier barrier;
    barrier = barrier_pool.get("my_barrier");

    // Alternative - distribute barrier objects themselves using the configuration database
    //  if (!uvm_config_db#(uvm_barrier)::get(p_sequencer, "", "barrier", barrier))
    //    `uvm_fatal(get_type_name(), "No barrier in config_db")

    barrier.set_threshold(2);

    repeat (m_count)
    begin
      barrier.wait_for();
      ...

class my_sequence2 extends uvm_sequence #(my_tx);
  ...
  task body;
    // Code to get barrier pool identical to my_sequence1 above
    ...
    barrier = barrier_pool.get("my_barrier"); // Same name as above
        // All sequences that access this barrier have to agree on the barrier name

    repeat (m_count)
    begin
      barrier.wait_for();
      ...

class virtual_seq extends uvm_sequence;
  ...
  task body;
    my_sequence1 seq1;
    my_sequence2 seq2;
    ...
    fork
      seq1.start(...);
      seq2.start(...);
    join
    ...
| ☐ A monitor should not assign values to variables or wires in the SystemVerilog interface. |
A monitor should passively watch an interface and from it create transactions, which it sends out through an analysis port for further processing by DUT-specific (or subsystem-specific) components. A monitor should always be written as a passive component and its execution should never be blocked by another UVM component or sequence. Use SVA and coverage directives in interfaces for protocol checking and coverage collection.
| ☐ Use concurrent assertions and cover property in interfaces for protocol checking and related coverage collection. |
Concurrent assertions are ideal for low-level protocol checking because of the power of the temporal operators (sequences) in SVA, and interfaces are a good place to put those assertions because they help ensure the integrity of signals passing through the interface. For the sake of reuse, any checking and coverage written in the interface itself should be restricted to the low-level behavior of the interface as opposed to DUT-specific behavior or end-to-end checking or coverage collection. Although it is possible to put properties in packages and concurrent assertions in modules, it is effective to put both in the interface since such assertions are typically quite simple in themselves and relate directly to the behavior of the interface. With regard to property-based coverage, keep specification coverage separate from implementation coverage, because specification coverage is more likely to be reusable. (See Functional Coverage.)
Split Transactors for Emulation/Acceleration
When running a UVM simulation on an accelerator or emulator box, the UVM test bench running on the host computer can easily become a bottleneck because it is running much slower than the DUT. This issue can be addressed by moving as much of the UVM test bench code as possible onto the accelerator or emulator box in order to speed up simulation. This means splitting each transactor (UVM driver or monitor) into two parts, a lightweight proxy or wrapper that continues to run on the host, and a synthesizable part (BFM or Bus-Functional Model) that runs on the box and wiggles the pins of the DUT.
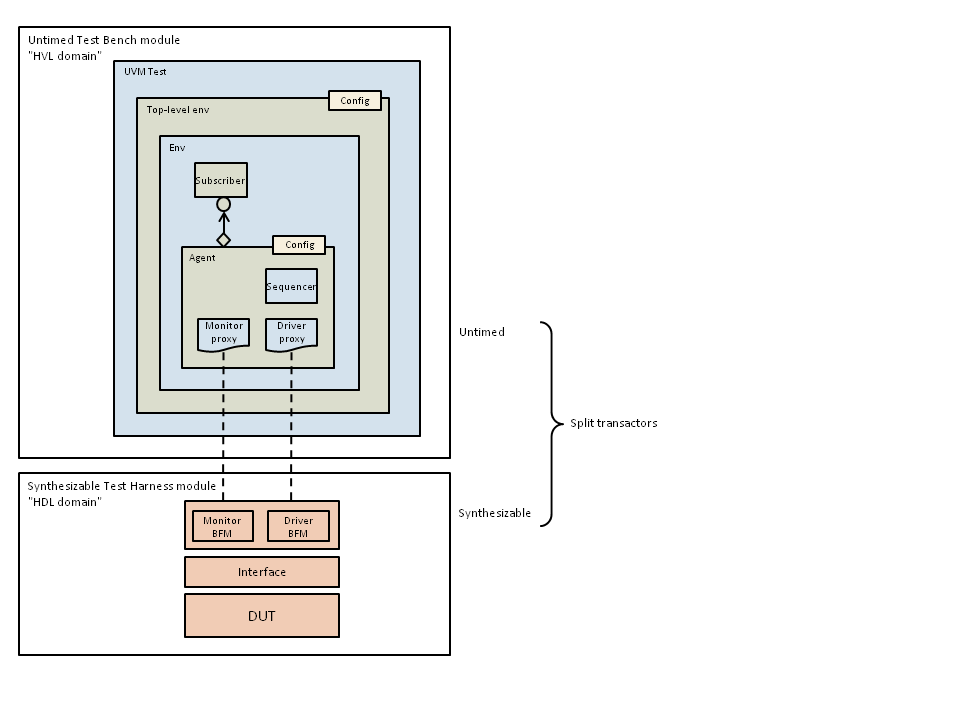
Figure: Dual-Top Modules and Split Transactors
| ☐ For emulation/acceleration, have two top-level SystemVerilog modules, one module that runs on the host computer and instantiates the UVM verification environment and a second module that is synthesized and runs on the emulator or accelerator. |
The SystemVerilog module on the emulator should instantiate the DUT, contain any code for clock and reset generation, and contain the synthesizable parts of the transactors (BFMs).
| ☐ The UVM verification environment running on the host computer should be untimed. It should not contain any delays or refer to any clocks. Any delays and clocks should be moved to the emulator/accelerator. |
Although the UVM environment running on the host should not contain explicit delays or clocks, UVM processes within sequences and drivers may sometimes need to be synchronized with one another using SystemVerilog events or blocking method calls. Care should be taken to ensure that the driver proxy is always able to respond when it needs to (rather than being blocked waiting for an event somewhere in the sequencer stack).
| ☐ Split each UVM driver and monitor into two parts, an untimed part that runs on the host and a synthesizable part (BFM) that runs on the emulator/accelerator. |
The supplier of the emulator/accelerator box and its supporting software tool flow may provide tools to facilitate simple communication between the two parts of each transactor or may impose limitations or restrictions on how they are coded. For example, the proxy transactors on the host may be able to call the methods of the synthesizable transactors on the box using nothing but a SystemVerilog virtual interface. Alternatively, the user may need to write explicit DPI code to pass transactions back and forth. Similarly, each tool vendor will impose different coding rules with regard to the synthesizability of transactors. Check the details with your vendor.
Transactions
| ☐ Create user-defined transaction classes by extending the class uvm_sequence_item. |
As opposed to extending class uvm_transaction, which cannot be used a sequence item.
| ☐ Try to minimize the number of distinct transaction classes. |
Use the same transaction class for the driver and monitor of an agent. Maintaining multiple transaction classes often requires more effort than maintaining a single class.
| ☐ Register the transaction class with the factory using the macro `uvm_object_utils as the first line within the class. |
The use of field macros is not recommended in these guidelines, but if you do use field macros, you should register the transaction class immediately after the declaration of any member variables using the macro `uvm_object_utils_begin.
| ☐ Do not use field macros. |
It is certainly possible to use field macros successfully if you know what you are doing, but allowing the use of field macros may not be the best choice for a company or project team trying to create and maintain a high-quality codebase. The use of field macros has led some users to experience a compile-time and run-time overhead, increased difficulty with debug, and has been the cause of obscure and confusing behavior. If despite these recommendations you still want to go ahead and use field macros, only do so if you are confident you have a thorough understanding of their behavior (some of which is non-obvious).
| ☐ After the factory registration macro, declare any member variables (using the prefix m_ as a naming convention). |
| ☐ Use the rand qualifier in front of any class member variables that might need to be randomized, now or in the future. |
A transaction may include protocol variables and control knobs that would need to be randomized, but also meta-data (e.g. information to help with debug) that you would not want randomized.
| ☐ After any member variables, define a constructor that includes a single string name argument with a default value of the empty string, a call to super.new, and is otherwise empty. |
The constructor should take the following form:
function new (string name = "");
  super.new(name);
endfunction
| ☐ After the constructor, always override the convert2string, do_copy, do_compare, do_print, and do_record methods. |
It is best to override all of these methods if you cannot anticipate how the transaction class might be reused in the future, although it is possible to omit specific methods if they are not called.
| ☐ Consider overriding the do_pack and do_unpack methods. |
It is advisable to override these methods for the sake of reusability. They would be called whenever a transaction needs to be serialized, passed over the DPI, or treated as a packed vector in order to alias certain fields. Also, do_pack would typically omit meta-data from the resultant bitstream.
| ☐ When overriding do_pack and do_unpack, use the packing and unpacking macros (e.g. `uvm_pack_int) where they will simplify the code. |
The packing and unpacking macros expand to straightforward code very similar to what you might have written anyway, but it might not always be possible to use them if the packing operation is unusually complicated. (See example below.)
| ☐ When overriding do_record, use the recording macros (e.g. `uvm_record_attribute and `uvm_record_field) where they will simplify the code. |
Note that the implementation of transaction recording can be vendor-specific, so care must be taken to make the code portable. (See example below.)
| ☐ When overriding the do_print, do_record, do_compare, and do_pack methods, do not make use of the printer, recorder, comparer, and packer policy object arguments to those methods within the body of the overridden method. |
The policy object arguments do have their uses, but they are not necessary in most cases and they add complexity to the code.
Example:
class my_tx extends uvm_sequence_item;
  `uvm_object_utils(my_tx)

  typedef enum logic {R = 0, W = 1} cmd_t;

  rand cmd_t m_cmd;      // Enum type for illustration
  rand int   m_addr;     // Integral field for illustration
  rand bit   m_data[];   // Dynamic array for illustration

  constraint c_data { m_data.size == 8; }

  function new (string name = "");
    super.new(name);
  endfunction

  function string convert2string;
    string s;
    $sformat(s, "%s", super.convert2string());
    $sformat(s, " cmd=%b, addr=%0d, data=%p", m_cmd, m_addr, m_data);
    return s;
  endfunction

  function void do_copy(uvm_object rhs);
    my_tx tx;
    $cast(tx, rhs);
    super.do_copy(rhs);
    m_cmd  = tx.m_cmd;
    m_addr = tx.m_addr;
    m_data = new[tx.m_data.size];
    foreach (tx.m_data[i])
      m_data[i] = tx.m_data[i];
  endfunction

  function bit do_compare(uvm_object rhs, uvm_comparer comparer);
    my_tx tx;
    bit status = 1;
    $cast(tx, rhs);
    status &= super.do_compare(rhs, comparer);
    status &= (m_cmd  == tx.m_cmd);
    status &= (m_addr == tx.m_addr);
    foreach (tx.m_data[i])
      status &= (m_data[i] == tx.m_data[i]);
    return status;
  endfunction

  function void do_print(uvm_printer printer);
    if (printer.knobs.sprint == 0)
      `uvm_info(get_type_name(), convert2string(), UVM_MEDIUM)
    else
      printer.m_string = convert2string();
  endfunction

  function void do_record(uvm_recorder recorder);
    super.do_record(recorder);
    `uvm_record_field("cmd",  m_cmd)  // Confined to integral fields
    `uvm_record_field("addr", m_addr)
    foreach (m_data[i])
      `uvm_record_field($sformatf("data%0d",i), m_data[i])
  endfunction

  function void do_pack(uvm_packer packer);
    super.do_pack(packer);
    `uvm_pack_enum(m_cmd)
    `uvm_pack_int(m_addr)
    foreach (m_data[i])
      `uvm_pack_int(m_data[i])  // `uvm_pack_array needs packer.use_metadata==1
  endfunction

  function void do_unpack(uvm_packer packer);
    super.do_unpack(packer);
    `uvm_unpack_enum(m_cmd, cmd_t)
    `uvm_unpack_int(m_addr)
    m_data = new[8];
    foreach (m_data[i])
      `uvm_unpack_int(m_data[i]) //`uvm_unpack_array needs packer.use_metadata==1
  endfunction

endclass
| ☐ Always instantiate transaction objects using the factory. |
Instantiations should take the form:
var_name = transaction_type::type_id::create("var_name");
| ☐ In general, the string name of the transaction should be the same as the variable name. |
This makes it easier to associate UVM object path names with SystemVerilog variables names during debug.
Sequences
| ☐ Create user-defined sequence classes by extending the class uvm_sequence, parameterized with the type of the transaction to be generated by the sequence. |
See Example.
| ☐ Register the sequence class with the factory using the macro `uvm_object_utils as the first line within the class. |
The use of field macros is not recommended in these guidelines, but if you do use field macros, you should register the sequence class immediately after the declaration of any member variables using the macro `uvm_object_utils_begin.
| ☐ After the factory registration macro, declare any member variables (using the prefix m_ as a naming convention). |
| ☐ Use the rand qualifier in front of any class member variables that might need to be randomized, now or in the future. |
A sequence may include variables and control knobs that would need to be randomized, but also meta-data (e.g. information to help with debug) that you would not want randomized. The control knob idiom is useful when writing constrained random sequences. That is, define rand variables within the sequence object, use those variables within the body task to control the behavior of the sequence, and set or constrain the values of those variables when the sequence object is randomized, using an in-line constraint, for example.
| ☐ After the member variables (if any), define a constructor that includes a single string name argument with a default value of the empty string, a call to super.new, and is otherwise empty: |
The constructor should take the following form:
function new (string name = "");
  super.new(name);
endfunction
| ☐ Any housekeeping code associated with the execution of a sequence, such as raising and lowering objections, should be placed in the pre_start and post_start methods of the sequence. |
The body method of the sequence should only execute the raw functional behavior of the sequence. pre_start and post_start are referred to as user-definable callbacks in the UVM class reference. For example, you could create a base class that defines pre_start and post_start to perform housekeeping activities, and then only define the body task in an extended sequence class. Always override pre_start and/or post_start as opposed to pre_body and/or post_body, because you cannot be sure that the latter methods will actually be called, depending on how the sequence is started, and there is some discussion of deprecating pre_body and post_body. (See Objections, p_sequencer)
| ☐ When generating transactions from the body task of a sequence, do so using procedural code with the following general pattern: |
req = tx_type::type_id::create("req");
start_item(req);
if ( !req.randomize() ) ...
finish_item(req);
The transaction name need not always be "req", though the variable name and the string name should always be the same. Additional procedural statements, function arguments, and in-line constraints may be inserted as necessary.
| ☐ Do not use the `uvm_do family of macros. |
The use of these macros has led some users to experience difficulty with debug and with confusing behavior. The alternative procedural coding style (shown immediately above) makes it easier to understand what each step is doing and easier to debug. If despite this recommendations you still want to go ahead and use the `uvm_do macros, only do so if you are confident you have a thorough understanding of their behavior.
| ☐ Use the built-in transaction variables req and rsp within a sequence, unless there is a specific reason to choose different variable names. |
The variables req and rsp are inherited from the base class uvm_sequence. You might want to choose alternative variable names depending on the actual names of the transactions as used in the interface definition. A similar rule applies in the driver.
| ☐ Only generate sequence items (transactions) from UVM sequences, not from ad hoc classes and not from UVM components. |
| ☐ Always instantiate sequence objects using the factory. Instantiations should take the form: |
seq_name = sequence_type::type_id::create("seq_name");
| ☐ The string name of each sequence object should be the same as the variable name. |
Except where there is a specific reason for the string name to differ from the variable name, such as when creating multiple sequence objects in a loop using the same variable.
| ☐ When creating a sequence object, always call the randomize method of the sequence object before starting the sequence. |
This applies even when the apparent class of the sequence object does not contain any rand data members, because the type of the sequence object could have been overridden using the factory. This rule applies whenever a sequence object is created and randomized, whether from another sequence or from a component.
| ☐ Always check the value returned by the randomize method and report an error should randomization fail. |
A randomization failure is an indication of conflicting constraints, a circumstance that needs to be detected and debugged, so do not ignore randomization failures.
| ☐ Start sequences procedurally by calling their start method. |
Example:
seq_name = sequence_type::type_id::create("seq_name");
seq_name.set_item_context(null, sequencer);
if ( !seq_name.randomize() with { ... } )
  `uvm_error( ... )
seq_name.start(sequencer);
Additional procedural statements, function arguments, and in-line constraints may be inserted as necessary. Avoid using the "default_sequence" configuration parameter as a way to start sequences. UVM 1.2 recommends using the class uvm_sequence_library if you want to start sequences at the beginning of a phase. This can be a useful technique for starting background traffic on a sequencer, but calling the start method should be used as the primary way of starting sequences.
| ☐ Only override the pre_do, mid_do, and/or post_do callbacks of a sequence class as a way to modify the behavior of a pre-existing "immutable" sequence class. |
That is, only override these callbacks for a sequence for which you either do not have access to the source code or do not wish to modify the source code. Do not override the pre_do, mid_do, and/or post_do callbacks as a way to modify the behavior of the body task of the immediately enclosing sequence class, but only as a way to modify the behavior of some other sequence class which you are extending. Having defined one or more of these callbacks, you would need to use a factory override to replace the original sequence class with the extended sequence class.
Example:
// Original sequence class that we do not want to modify
class vip_seq extends uvm_sequence #(my_tx);
  `uvm_object_utils(vip_seq)

  function new (string name = "");
    super.new(name);
  endfunction

  task body;
    req = my_tx::type_id::create("req");
    start_item(req);
    if( !req.randomize() ) ...
    finish_item(req);
    ...
// Sequence extended for a specific test
class alt_seq extends vip_seq;
  `uvm_object_utils(alt_seq)
  ...
  int prev_addr = 0;

  function void mid_do(uvm_sequence_item this_item);
    my_tx tx;
    $cast(tx, this_item);
    tx.m_addr = prev_addr + $urandom_range(1, 7); // Overwrite the address field
  endfunction

  function void post_do(uvm_sequence_item this_item);
    my_tx tx;
    $cast(tx, this_item);
    prev_addr = tx.m_addr; // Store the address to constrain the next transaction
  endfunction
endclass
class my_test extends existing_test;
  `uvm_component_utils(my_test);
  ...

  function void start_of_simulation_phase(uvm_phase phase);
    // Factory override to replace the original sequence
    vip_seq::type_id::set_type_override( alt_seq::get_type() );
  endfunction
endclass
| ☐ Use the macro uvm_declare_p_sequencer to declare a variable p_sequencer in situations where a sequence needs access to the sequencer on which it is running. |
The use of the p_sequencer variable to access the sequencer on which a sequence is running can help clarify the structural relationships between sequences and sequencers. The method uvm_sequence_item::get_sequencer() could be used instead to return the sequencer, but the return value has the base type uvm_sequencer_base. The macro uvm_declare_p_sequence allows you to define a specific sequencer type. Do not use the internal variable uvm_sequence_item::m_sequencer.
Example:
class my_sequence extends uvm_sequence #(my_tx);
  `uvm_object_utils(my_sequence)
  `uvm_declare_p_sequencer(the_sequencer_class_name)
  ...

  task pre_start;
    // Get the configuration object associated with the sequencer component
    // on which this sequence is currently running
    uvm_config_db #(my_config)::get(p_sequencer, "",  "config", m_config);
  endtask

  task body;
    // Set the arbitration algorithm of the current sequencer
    p_sequencer.set_arbitration(SEQ_ARB_STRICT_RANDOM);
    begin
      sequence2 seq2;
      seq2 = sequence2::type_id::create("seq2");
      seq2.set_item_context(this, p_sequencer);
      if ( !seq2.randomize() )
        `uvm_error(get_type_name(), "Randomize failed")
      // Start a child sequence on the current sequencer
      seq2.start(p_sequencer, this);
  ...
  endtask
endclass
| ☐ Where a sequence needs access to a sequencer other than the sequencer on which it is itself running, add a member variable to the sequence object and assign that variable to refer to the other sequencer before starting the sequence. |
This can occur where a virtual sequence needs a reference to a sequencer on which it is to start a sequence or where a layering sequence needs a reference to a sequencer from which it is to get a transaction. In either case the member variable in the sequence object should be set to refer to the other sequencer before the sequence in question is started. This approach is anyway necessary in the case where a virtual sequence runs on the null sequencer, because the p_sequencer variable cannot be used to gain acces to the component hierarchy if its value is null.
Example:
class my_sequence extends uvm_sequence #(my_tx);
  `uvm_object_utils(my_sequence)

  // Control knob idiom: a data member constrained when the sequence
  // is started
  rand int m_control_knob;

  function new (string name = "");
    super.new(name);
  endfunction

  task body;
    repeat (m_control_knob) // Number of transactions
    begin
      req = my_tx::type_id::create("req");
      start_item(req);
      if (!req.randomize())
         `uvm_error(get_type_name(), "Randomize failed")
      finish_item(req);
    end
  endtask
endclass

class my_virtual_sequence extends uvm_sequence;
  `uvm_object_utils(my_virtual_sequence)

  my_sequencer m_child_sequencer; // Reference to child sequencer

  function new (string name = "");
    super.new(name);
  endfunction

  task body;
    // Start a non-virtual child sequence
    my_sequence seq;
    seq = my_sequence::type_id::create("seq");
    seq.set_item_context(this, m_child_sequencer);
    if ( !seq.randomize() with { m_control_knob < 8; } )
      `uvm_error(get_type_name(), "Randomize failed")
    seq.start(m_child_sequencer, this);
  endtask
endclass

class my_env extends uvm_env;
  ...
  function void run_phase(uvm_phase phase);
    // Create and start a virtual sequence
    my_virtual_sequence vseq;
    vseq = my_virtual_sequence::type_id::create("vseq");
    if (!vseq.randomize())
      `uvm_error(get_type_name(), "Randomize failed")

    // Set path within sequence object to sequencer for child sequence
    vseq.m_child_sequencer = m_agent.m_sequencer;

    phase.raise_objection(this, "Start of my_env");
    vseq.start(null, null);
    phase.drop_objection(this, "End of my_env");
  endfunction
  ...
endclass
Stimulus and Phasing
| ☐ Use a virtual sequence to coordinate the behavior of multiple agents. |
Do not over-constrain virtual sequences. Virtual sequences should be used to orchestrate the activity of multiple parallel agents but without over-constraining the activity of those agents. For constrained random verification, virtual sequences should not be thought of as being directed tests. Avoid having virtual sequences that generate very specific scenarios except where absolutely necessary. (Top-level sequences may be generated automatically to exercises very specific scenarios when using a graph-based stimulus approach, but that is another matter.)
| ☐ Virtual sequences should be started on the null sequencer |
Unless there is a specific reason to define and instantiate a sequencer, for example, to access common properties stored in a sequencer object or to access the configuration database. (Note that a virtual sequence does not interact with the sequence queue of the sequencer on which it runs.) (See Example.)
| ☐ Have a top-level sequence running on each agent that selects between all permissible child sequences at random. |
Avoid over-constraining any top-level sequence. For constrained-random verification, start from the assumption of randomization. Where directed sequences are required they should be selected as one choice amongst many, not the default. You can add a specific test to constrain a top-level sequence to select a directed sequence. (Top-level sequences may be generated automatically to exercises very specific scenarios when using a graph-based stimulus approach, but that is another matter.)
| ☐ Keep sequences as generic as possible. Avoid writing directed sequences except where absolutely necessary. |
Basic sequences should assume as little as possible about the context they run in so that they can generate any scenario. In general, avoid having sequences that are designed to exercise very specific scenarios. One exception to this rule would be a sequence that generates the specific conditions needed to reproduce a bug, in which case the name of the sequence and any associated coverpoint should identify the bug.
| ☐ Sequences should not be phase-aware. |
Writing sequences such that they can be started in any run-time phase helps to make the stimulus code re-usable.
| ☐ Do override the run-time phase methods reset_phase, configure_phase, main_phase, shutdown_phase to generate stimulus, typically by starting sequences, but never in a driver, monitor, subscriber, or scoreboard component. |
The driver, monitor, subscriber, or scoreboard component should be able to run regardless of the run-time phase. Making any component explicitly phase-aware will in general restrict the possibilities for reuse, the alternative being to make the behavior of the run_phase method dependent on the value of some state variable and thus runnable in parallel with any run-time phase. But do override the reset, configure, main, and shutdown phase methods where the method name is appropriate to the action being taken.
| ☐ Do introduce user-defined run-time phases where the above predefined run-time phase methods are inappropriately named or would cause confusion. |
An example might be where the DUT requires a training phase in addition to a configuration phase, or where the DUT requires multiple main phases. Using clearly-named run-time phase methods makes it easier to integrate multiple environments.
| ☐ When integrating multiple environments that each override the predefined or user-defined run-time phase methods, take care to order the phases correctly by introducing phase domains and synchronizing phases across domains. |
UVM does not impose any definitive rules on what can be done in each of the built-in run-time phases. When integrating components that use predefined or user-defined run-time phases, it is possible to place different components in different domains and define explicitly the relationship between the phases in different domains by synchronizing phases across domains.
Example:
class top_level_env extends uvm_env;
  ...
  env m_env1;
  env m_env2; // Environments to be integrated

  function void build_phase(uvm_phase phase);
    uvm_domain domain1, domain2;

    m_env1 = env::type_id::create("m_env1", this);
    m_env2 = env::type_id::create("m_env2", this);

    domain1 = new("domain1");
    m_env1.set_domain(domain1);

    domain2 = new("domain2");
    m_env2.set_domain(domain2); // Two new phase domains

   // Synchronize specific run-time phases across domains
    domain1.sync(domain2, uvm_reset_phase::get(), uvm_configure_phase::get());
    ...
| ☐ Do not override the predefined pre- and post- phase methods (e.g. pre_reset_phase), but reserve these phase for use when synchronizing phases across domains. |
The predefined run-time phases with the pre_ and post_ prefixes have informal descriptions that are extremely similar to the other predefined phases. To avoid making unwarranted assumptions about the meaning of these phases it is best to confine yourself to overriding the reset, configure, main, and shutdown phases and to add user-defined phases in other cases. However, the pre- and post- phases make very useful synchronization hooks when ordering the predefined phases across domains. It would even be possible to define pre- and post- phases for user-defined phases just for this purpose alone.
Example:
domain1.sync(domain2, uvm_configure_phase::get(), uvm_post_configure_phase::get());

domain1.sync(domain2, my_post_training_phase::get(), uvm_pre_main_phase::get());
| ☐ Do plan any phase jumps carefully to ensure UVM components are left in a consistent state. |
If you choose to execute phase jumps you must take great care to clean up properly when a phase is aborted. Do not use phase jumping casually. There are no built-in safeguards. Backward jumps should be restricted to jumping to other run-time phases. Forward jumps should be restricted to jumping to the common phases that follow the run-time phases.
Objections
| ☐ Determine when to end the test by raising and dropping objections in any classes that may need to extend the test while they complete some processing. (This rule has changed significantly since the first preliminary release of these guidelines.) |
The rationale behind using objections is that the determination of when to end the test needs to depend on the interaction of components distributed around the verification environment. Raising and dropping objections at the start and end of a top-level sequence is easy to code but is insufficient to address the issue that objections were introduced to solve, namely that the test can only end when the downstream processing of the final transaction is complete. Typically, a driver should raise an objection each time it gets a transaction from a sequencer and drop the objection when it has finished the pin wiggling associated with that transaction. A monitor should raise an objection when it detects the start of a new transaction and should drop the objection when it is sends the transaction through the analysis port. A scoreboard should raise an objection for each item that needs matching with other items still to be received from the DUT.
| ☐ Call the set_propagate_mode(0) method of every objection (UVM 1.2 onward) to disable the hierarchical propagation of that objection. |
The behavior prior to UVM 1.2 (and the default in UVM 1.2) is to propagate every objection up the component hierarchy, which imposes a measurable simulation speed penalty but is usually functionally redundant.
| ☐ Consider the simulation speed impact of raising and dropping objections in inner loops, e.g. for individual transactions. Remove objections from inner loops if the simulation speed penalty is significant. |
As always, simulation execution speed is dominated by the instructions executed by inner loops, which in the case of a verification environment usually means code executed per-transaction. In many scenarios the speed impact of objections will be swamped by other processing done per-transaction. When it is not, you should find ways to raise and drop objections less frequently or remove objections that are redundant because their behavior is covered by other objections.
| ☐ Where a sequence is to raise and drop objections, it should call raise_objection in its pre_start method and drop_objection in its post_start method. |
Although objections could be raised and dropped in the body task of the sequence, it is more consistent to confine objections to the pre/post_start methods.
| ☐ Always perform the test if (starting_phase != null) before calling raise_objection or drop_objection within a sequence. |
Prior to UVM 1.2, starting_phase was a member of the class uvm_sequence_base. From UVM 1.2 onward, the starting_phase variable is deprecated and instead must be accessed using the get_starting_phase method:
task pre_start;
  uvm_phase starting_phase = get_starting_phase(); // uvm-1.2
 if (starting_phase != null)
    starting_phase.raise_objection(this, "Sequence started");
endtask
| ☐ When starting a sequence that can raise and drop objections, if you want the sequence to raise and drop objections, set the starting_phase member of the sequence object before starting the sequence. |
From UVM 1.2 onward, the starting_phase variable is deprecated and must be set using the set_starting_phase method:
task run_phase(uvm_phase phase);
  my_sequence seq;
  seq = my_sequence::type_id::create("seq");
  seq.set_item_context(null, sequencer);
  if ( !seq.randomize() )
    `uvm_error( ... )
 seq.set_starting_phase(phase); // uvm-1.2
  seq.start(sequencer);
endtask
| ☐ When calling raise_objection or drop_objection, always pass a string as a 2nd argument to describe the objection to help with debug. |
The command line flag +UVM_OBJECTION_TRACE turns on objection tracing, which prints out the description argument of each call to raise or drop an objection.
| ☐ If the kill method of a sequence is called and the sequence can raise an objection, ensure that the do_kill method of the sequence is overridden to drop the objection. |
Otherwise the objection may never be dropped, which would prevent the phase from ending. In the case that a sequence ends prematurely due to a phase jump, all objections counts are automatically cleared, so the objection need not be dropped explicitly. kill is not called automatically on a phase jump. For example:
function void do_kill;
 if (starting_phase != null)
    starting_phase.drop_objection(this, "Sequence ended prematurely");
endtask
Components
| ☐ Create user-defined component classes by extending the appropriate subclass of class uvm_component in order to indicate intent. |
For example, monitors should extend uvm_monitor, scoreboards should extend uvm_scoreboard, and so forth.
| ☐ Register the component class with the factory using the macro `uvm_component_utils as the first line within the class. |
The use of field macros is not recommended in these guidelines, but if you do use field macros, you should register the transaction class immediately after the declaration of any member variables using the macro `uvm_component_utils_begin.
| ☐ After the factory registration macro, declare any ports, exports and virtual interfaces |
Using the suffixes given in the section on Lexical Guidelines and Naming Conventions.
| ☐ After the ports, exports, and virtual interfaces, declare any member variables (using the prefix m_ as a naming convention). |
This will include member variables that store references to sub-components, if there are any.
| ☐ After any member variables, define a constructor that includes string name and parent arguments with no default values and a call to super.new. |
Other than the call to super.new, the constructor should otherwise be empty unless it needs to instantiate covergroups or initialize constants:
function new (string name, uvm_component parent);
   super.new(name, parent);
endfunction
| ☐ Instantiate any components from the build_phase method. |
As opposed to instantiation from the constructor or any other phase method.
| ☐ Always instantiate components using the factory. |
Instantiations should take the form:
var_name = component_type::type_id::create("var_name", this);
| ☐ The string name of the component should be the same as the variable name. |
Except where there is a specific reason for the string name to differ from the variable name, such as when creating multiple component objects in a loop using the same variable.
| ☐ The second argument to create should be the reserved word this. |
The second argument represents the parent of the component being instantiated.
| ☐ Where a user-defined component class extends another user-defined component class, care should be taken to insert calls of the form super.<phase_name>_phase wherever appropriate, that is, where the corresponding base class phase method performs some action. |
Where a user-defined component class directly extends a class from the UVM base class library, it is not necessary for the built-in phase methods to make method calls of the form super.<phase_name>_phase, although this used to be a recommendation in OVM.
function void connect_phase(uvm_phase phase);
 super.connect_phase(phase); // Not necessary when extending uvm_component
  ...
endfunction
| ☐ Where a user-defined component class directly extends a class from the UVM base class library and overrides the standard build_phase method, do not call super.build_phase. |
If, contrary to this recommendation, you do call super.build_phase, it must be understood that the uvm_component::build_phase method calls apply_config_settings, which will set the value of any field registered using a field macro to the corresponding value taking from the configuration database in the case where the field name and the hierarchical name of the component happen to match the name and scope in the configuration database.
Example:
class my_component extends uvm_env;
  `uvm_component_utils(my_component)

  // Transaction-level ports and exports
  uvm_analysis_port #(my_tx) a_port;

  // Virtual interfaces
  virtual dut_if vif;

  // Internal data members (variables)
  my_agent m_agent;

  // Constructor
  function new (string name, uvm_component parent);
    super.new(name, parent);
  endfunction

  // Standard phase methods
  function void build_phase(uvm_phase phase);
    a_port = new("a_port", this);
    m_agent = my_agent::type_id::create("m_agent", this);
  endfunction

  function void connect_phase(uvm_phase phase);
    ...
  endfunction

  task run_phase(uvm_phase phase);
    ...
 endfunction

endclass
Connection to the DUT
| ☐ Use one SystemVerilog interface instance per DUT interface. |
For example, a DUT interface might be a bus interface, network interface, or serial interface. The SystemVerilog interface is used to pass information between the UVM verification environment and the DUT.
| ☐ Use virtual interfaces to access the SystemVerilog interface instances from the UVM verification environment. |
Having virtual interfaces within the class-based verification environment that refer to actual interface instantiations within the module-based environment allows agents within the UVM verification environment to sense and drive nets and variables in the SystemVerilog interfaces connected to the DUT. As an alternative advanced coding technique, if you make heavy use of parameterized interfaces, you may need to overcome the shortcomings of parameterized virtual interfaces in SystemVerilog by calling the methods of an abstract base class from the verification environment while making a concrete instantiation of that abstract base class inside the interface. (See How to Access a Parameterized SystemVerilog Interface from UVM.)
| ☐ Encapsulate virtual interfaces inside a configuration object in the configuration database. |
Any virtual interface that refers to a SystemVerilog interface instance should be encapsulated within a configuration object and that object should be set into the configuration database. The call to uvm_config_db::set should be made from the scope of a SystemVerilog module that has access to the corresponding interface instance (possible using a hierarchical name). (See Configurations.)
| ☐ Copy virtual interfaces from the top-level configuration object to the configuration objects associated with agents or lower-level envs in the build_phase method of the top-level env. |
Virtual interfaces should be copied top-down from configuration object to configuration object, starting from the top-level configuration object that is created by a SystemVerilog module and finishing in the configuration object associated with an agent. There may be one or more intermediate configuration objects associated with nested envs. The virtual interfaces should be extracted from the top-level configuration object in the top-level env, not in the test, so that the env can run standalone with an empty or trivial test class.
Example:
class top_env extends uvm_env;
  ...
  top_config m_config;
  bus_config m_bus_config;

  function void build_phase(uvm_phase phase);
    if (!uvm_config_db #(top_config)::get(this, "", "config", m_config))
      `uvm_error(get_type_name(), "Unable to get top_config")
    m_bus_config     = new("m_bus_config");
    m_bus_config.vif = m_config.bus_vif;
    ...
    uvm_config_db #(bus_config)::set(this, "m_bus_env", "config", m_bus_config);
 endfunction
  ...
endclass
| ☐ An agent should check that its virtual interface has been set. |
An agent should get the virtual interface from its configuration object and assign the virtual interface variables in its driver and monitor. If the virtual interface is null the agent should report a fatal error, since simulation will be unable to continue and user-defined error reports are easier to debug than simulator crashes.
Example:
class bus_agent extends uvm_agent;
  ...
  bus_config m_config;

  function void bus_agent::build_phase(uvm_phase phase);
    if (!uvm_config_db #(bus_config)::get(this, "", "config", m_config))
      `uvm_error(get_type_name(), "bus config not found"
    if (m_config.vif == null)
     `uvm_fatal(get_type_name(), "bus virtual interface not set")
    ...
TLM Connections
| ☐ Make TLM port/export connections and assign virtual interfaces in the connect_phase method. |
| ☐ Communicate between UVM components using ports and exports, including analysis ports and exports where appropriate. |
In general, prefer ports and exports for communication between components rather than using ad hoc shared objects or other UVM communication mechanisms. Where ad hoc synchronization is required, use the uvm_event or uvm_barrier to synchronize components. (See Clocks, Timing, Synchronization, and Interfaces).
| ☐ Use analysis ports and analysis exports (or objects of class uvm_subscriber) when making one-to-many connections between UVM components. |
In many situations, analysis ports and exports are preferable to regular ports and exports because analysis ports support the broadcast of transactions to multiple components (so-called subscribers) and allow ports to be left unconnected. On the other hand, regular ports and exports enforce one-to-one connections, which may sometimes be what you want. Analysis ports are usually the best choice for passing transactions out of agents and for passing transactions to or between scoreboards, checkers, and coverage collector components.
| ☐ When making peer-to-peer connections between components, connect a port (or analysis port) directly to an export (or analysis export) without any intervening FIFO. |
Direct port-to-export connections should be regarded as the norm in UVM, with FIFOs only inserted when needed. When FIFOs are needed, they should be inserted inside components rather than between components.
| ☐ Communicate with an agent in one of two ways: Either connect the analysis port of the agent to a subscriber or access the sequencer within the agent using a direct object reference from outside. |
Since agents have a known internal structure, it is permissible to access internal objects directly from outside using hierarchical object references. It is recommended to connect the analysis port of the monitor to an analysis port of the agent, but it is also possible to access the analysis port of the monitor directly from outside.
Configurations [UPDATED]
The UVM configuration database, described in this section, is separate and distinct from the UVM factory, which is described in the next section.
| ☐ Use the configuration database uvm_config_db rather than the resource database uvm_resource_db. |
The only reason for using uvm_resource_db rather than uvm_config_db would be that they have different rules when setting the same item (i.e. same name and same scope) multiple times. Some experts recommend using uvm_resource_db when the scope string does not represent a path in the UVM component hierarchy and uvm_config_db when it does. However, rather than learning two sets of rules, you can accomplish everything you need to do using the uvm_config_db alone. Although the scope string would usually represent the hierarchical path name of an actual component, it does not need to do so.
| ☐ Group the configuration parameters for a given component into a configuration object and set that configuration object into the configuration database. |
Configuration parameters may be stored in the configuration database singly (by means of individual calls to set and get) or may be grouped within a configuration object. In general, it is better to use a configuration object, because this provides a single place where you expect to find the configuration parameters and allows all the configuration parameters to be randomized with a single call. The configuration database will actually contain a reference to the configuration object rather than the object itself.
| ☐ The top-level configuration object should contain references to any lower-level configuration objects. [UPDATED] |
The top-level configuration object should be instantiated from the top-level module, and the lower level configuration objects should be instantiated from the constructor (new) of the top-level configuration object. Lower level configuration objects will typically be associated with agents. This approach has the benefit that there is no need to replicate or copy information between the top-level and lower level configuration objects, the top-level configuration object can include constraints that reference variables contained within the lower level configuration objects, and variables in any of the lower level configuration objects can be assigned from the top-level module or the test class as well as from the top-level env class. (See Example.)
| ☐ Create user-defined configuration classes by extending the class uvm_object. |
Extending uvm_object gives the configuration object a hierarchical name and enables UVM seeding for better random stability. Although configuration objects are not transactions or components, randomization can still be useful.
Example:
class my_agent_config extends uvm_object;
  virtual my_if vif;
  uvm_active_passive_enum is_active;
  bit coverage_enable; // From the UVM User Guide
  bit checks_enable;

  function new(string name = "");
   super.new(name);
  endfunction
endclass
| ☐ Use the class name <component_class>_config or <sequence_class>_config for the configuration class associated with a component or a sequence, respectively, where <component_class> is the class name of the component and <sequence_class> is the class name of the sequence. |
| ☐ Use the field name "config" for the configuration object in the configuration database. |
The variable name that refers to the configuration object once it is retrieved from the configuration database should always be m_config. (See Naming Conventions.)
| ☐ Do not register user-defined configuration classes with the factory. |
Although it is possible to register a configuration class with the factory, doing so would add unnecessary complexity. Think of the configuration object as a set of parameter values, not as stimulus.
| ☐ A component should typically get and set configuration parameters (typically configuration objects) in its build_phase method, as opposed to any other phase methods. |
Doing so allows those parameters to be visible in any child components. A component should extract parameters from its own configuration object, then construct configuration objects for any of its children that require their own configuration object, then set those configuration objects into the configuration database, all from the build_phase method. Exceptionally, there may be situations where configuration parameters are retrieved from the configuration database in later phases. UVM has a method wait_modified which can be called during the run phase to wake up a process when a configuration parameter is set, but it must be understood that setting and getting configuration parameters is a relatively costly operation in terms of CPU time.
Example: [UPDATED]
class my_agent_config extends uvm_object;
  virtual my_agent_if      vif;
  uvm_active_passive_enum  is_active = UVM_ACTIVE;
  bit                      coverage_enable;
  bit                      checks_enable;

  function new(string name = "");
    super.new(name);
  endfunction
endclass
class top_config extends uvm_object;
  rand my_agent_config  m_my_agent_config;

  function new(string name = "");
    super.new(name);
    m_my_agent_config                 = new("m_my_agent_config");
    m_my_agent_config.is_active       = UVM_ACTIVE;
    m_my_agent_config.checks_enable   = 1;
    m_my_agent_config.coverage_enable = 1;
  endfunction : new
endclass : top_config
module top_tb;
  ...
  top_config top_env_config;

  initial
  begin
    top_env_config = new("top_env_config");
    if ( !top_env_config.randomize() )
      `uvm_error("top_tb", "Failed to randomize top-level configuration object" )

    top_env_config.m_my_agent_config.vif = th.my_agent_if_0;

    uvm_config_db #(top_config)::set(null, "uvm_test_top", "config", top_env_config);
    uvm_config_db #(top_config)::set(null, "uvm_test_top.m_env", "config", top_env_config);

    run_test();
  end
endmodule
class top_env extends uvm_env;
  `uvm_component_utils(top_env)

  my_agent_config    m_my_agent_config;
  my_agent_agent     m_my_agent_agent;
  my_agent_coverage  m_my_agent_coverage;

  top_config         m_config;
  ...

  function void build_phase(uvm_phase phase);
    if (!uvm_config_db #(top_config)::get(this, "", "config", m_config))
      `uvm_error(get_type_name(), "Unable to get top_config")

    m_my_agent_config = m_config.m_my_agent_config;

    uvm_config_db #(my_agent_config)::set(this, "m_my_agent_agent", "config", m_my_agent_config);
    if (m_my_agent_config.is_active == UVM_ACTIVE )
      uvm_config_db #(my_agent_config)::set(this, "m_my_agent_agent.m_sequencer", "config", m_my_agent_config);
    uvm_config_db #(my_agent_config)::set(this, "m_my_agent_coverage", "config", m_my_agent_config);

    m_my_agent_agent    = my_agent_agent   ::type_id::create("m_my_agent_agent", this);
   m_my_agent_coverage = my_agent_coverage::type_id::create("m_my_agent_coverage", this);
  endfunction : build_phase
  ...
| ☐ Always check the bit returned from uvm_config_db#(T)::get to ensure that the configuration parameter exists in the configuration database. |
This check can also help to catch misspellings of the configuration parameter name.
| ☐ A sensible default value should be chosen if uvm_config_db#(T)::get returns 0. |
A verification component should have a sensible default behavior in the case that its configuration parameters have not been set. A configuration parameter could be left unset either by not setting a configuration object in the configuration database or by not setting the value of a parameter within the configuration object (assuming this can be detected). In either case the component should detect that the configuration parameter has not been set explicitly and should choose an appropriate default value.
| ☐ Each component should get the configuration object associated with that specific component instance, and should not get the configuration object of any other component instance. |
In other words, the call to get should always take the form:
uvm_config_db#(T)::get(this, "", ...);
Although a component should not in general get the configuration object of another unrelated component from the configuration database, a group of closely related components can share the same configuration object. For example, a driver, sequencer, monitor, or coverage collector can access the configuration object of the associated agent. This is best done by making multiple calls to uvm_config_db#(T)::set (See Example.) [UPDATED]
| ☐ The configuration object associated with any given component instance should be set by its parent or by some other direct ancestor of that component instance, and not by any other component instance. |
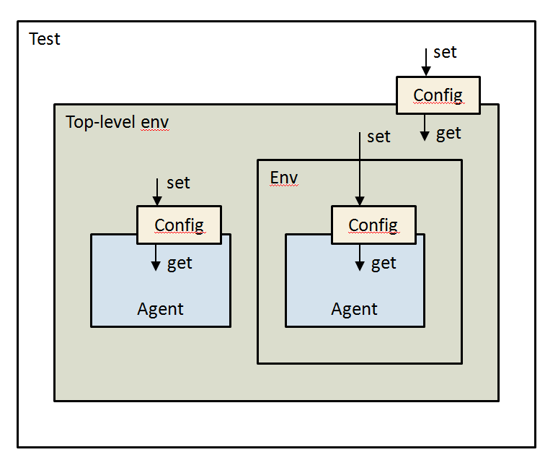
Figure: Using Configuration Objects
| ☐ Avoid using an absolute hierarchical path name as the 2nd argument to uvm_config_db#T(T)::set, and provide the shortest possible unique path name. |
Because we have a hierarchy of configuration objects that parallels the component hierarchy, a component would typically be setting the configuration objects of its immediate children, and would only need to reach deeper into the component hierarchy when a particular component has no configuration object. In general, if you do need to reach down into the component hierarchy from a test or env, use a wildcard at the start of the path name and provide the shortest possible unique name.
| ☐ A component instance may be associated with one configuration object or with no configuration object, and several component instances may be associated with the same configuration object. |
A component is not obliged to get or set a configuration object if there are no configuration parameters to be passed at that location in the component hierarchy.
| ☐ For an agent, include a variable is_active in the configuration object to determine whether the agent is active or passive. Override the virtual get_is_active method to return this value. Check get_is_active before creating and connecting the sequencer and driver within the agent. |
The UVM standard does not expose the is_active member of class uvm_agent but instead provides a virtual method get_is_active to get the value and overrides the method build_phase to set the value of is_active based on the value of the field "is_active" in the configuration database. Although we recommend that you should encapsulate the active/passive flag in the configuration object and override get_is_active to return this flag, we also recommend that as a defensive programming measure you should check the "is_active" field in the configuration database, if it exists, and warn of any inconsistencies between the value of the is_active field in the configuration objection and the "is_active" field in the configuration database.
Example:
class my_agent extends uvm_agent;
  `uvm_component_utils(my_agent)

  uvm_analysis_port#(my_transaction) a_port;

  my_config    m_config;
  my_sequencer m_sequencer;
  my_driver    m_driver;
  my_monitor   m_monitor;

  function new(string name, uvm_component parent);
    super.new(name, parent);
  endfunction

  function void build_phase(uvm_phase phase);
    if (!uvm_config_db #(my_config)::get(this, "", "config", m_config))
      `uvm_error(get_type_name(), "Agent config object is missing from config_db")

    if (get_is_active() == UVM_ACTIVE)
    begin
      m_sequencer = my_sequencer::type_id::create("m_sequencer", this);
      m_driver    = my_driver   ::type_id::create("m_driver", this);
    end

    m_monitor = my_monitor::type_id::create("m_monitor", this);
    a_port = new("a_port", this);
  endfunction

  function void connect_phase(uvm_phase phase);
    if (get_is_active() == UVM_ACTIVE)
      m_driver.seq_item_port.connect( m_sequencer.seq_item_export );
    m_monitor.a_port.connect( a_port );
  endfunction

  virtual function uvm_active_passive_enum get_is_active();
    return uvm_active_passive_enum'( m_config.is_active );
  endfunction

  /*
  // Alternative version that includes defensive programming to check for conflicts
  // between the config object and the "is_active" field

  local int m_is_active = -1;

  virtual function uvm_active_passive_enum get_is_active();
    if (m_is_active == -1)
    begin
      if (uvm_config_db#(uvm_bitstream_t)::get(this, "", "is_active", m_is_active))
      begin
        if (m_is_active != m_config.is_active)
          `uvm_warning(get_type_name(), "is_active field in config_db conflicts with config object")
      end
      else
        m_is_active = m_config.is_active;
    end
    return uvm_active_passive_enum'(m_is_active);
  endfunction
 */

endclass: my_agent
| ☐ If a sequence is to be parameterized, the parameters for the sequence should be put into a configuration object in the configuration database. The configuration object should be associated with the sequencer on which the sequence is to run. |
There may be multiple configuration objects in the configuration database associated with a particular sequencer but with different sequences that will run on that sequencer. It is the sequences and not the the sequencer component itself that will get these objects from the configuration database. Although it is possible for a sequence to get a configuration object from the configuration database without reference to the hierarchical path of a sequencer component, doing so makes it harder to separately parameterize multiple instances of that sequence that may be running on different sequencers or no sequencer. In other words, while a sequence is not obliged to get its configuration object through its sequencer, we recommend that it does so. (See Example.) [UPDATED]
| ☐ Any configuration object associated with a sequence should be got from the configuration database at the start of the sequence and a variable in the sequence object should be assigned to refer to that configuration object. [UPDATED] |
The variable that refers to the configuration object may be set before the sequence is started or within the sequence itself. It is better to get the configuration object only once, when starting the sequence, for performance reasons, and certainly not in an inner loop. On the other hand, to support late randomization, the sequence should use the most up-to-date state information when setting in-line constraints, so it is sometimes appropriate to get information from the configuration object in the body task of the sequence, assuming the configuration object refers to information that is being updated during the run-time phases. (See Example.) [UPDATED]
| ☐ If a component directly assigns the values of variables (including virtual interfaces) in its child components, it should do so in its build_phase method after creating those child components. |
A component may assign variables in its child components instead of using the configuration database to pass information from parent to child, although you should note that some flexibility is lost by doing this. An example would be an agent setting a virtual interface in its driver or monitor. It must be remembered that whereas the build_phase methods are called top-down, the connect_phase methods are called bottom-up with respect to the component hierarchy, so connect_phase cannot be used to propagate variable values down the hierarchy (because connect_phase for a child is called before connect_phases for its parent).
The Factory
| ☐ Always instantiate transaction, sequence, and component objects using the factory |
Instantiate these objects using the factory rather than using a direct call to new, that is, always instantiate transactions and sequences using a call of the form:
var_name = type_name::type_id::create("var_name");
and components using a call of the form
var_name = type_name::type_id::create("var_name", this);
where var_name is the name of a user-defined variable, type_name is the class of the object, type_id and create are names defined by UVM, and this is a SystemVerilog keyword. Using the UVM factory consistently in this way is one of the keys to being able to exploit OOP in UVM, because it allows the type of an object to be determined at run time rather than at compile time and hence to be overridden without needing to modify the source code (of the call the create).
| ☐ When using a factory override to substitute a transaction, sequence, or component object with another object whose class extends the class of the original, the factory override should take one of these forms: |
old_type_name::type_id::set_type_override( new_type_name::get_type() );
old_type_name::type_id::set_inst_override( new_type_name::get_type() ... );
This is in contrast to directly calling the methods of class uvm_factory, which is discouraged for the sake of consistency.
| ☐ Call the static method uvm_factory::get() when you need access to the factory. |
Do not use the global variable factory for access to the singleton factory (factory is anyway deprecated in UVM 1.2). An example is when calling the print method of the factory:
uvm_factory factory = uvm_factory::get();
factory.print();
Tests
| ☐ Do not generate stimulus directly from the test, but use the test to set configuration parameters and factory overrides. |
It is generally better to launch sequences from the environment rather than from the test, and to restrict the test to parameterizing or customizing the environment. The environment should know how to exercise the DUT. (See Stimulus.)
| ☐ Set up the fixed aspects of the verification environment and generate default stimulus in the env class, not the test class, so that the env will run even with an empty test. |
The env should run standalone and should exercise the DUT with legal stimulus, even given an empty test. In applications where classic constrained random verification is appropriate, coverage can be increased by repeating the test with different seeds. (See Coverage-Driven Verification Methodology.)
| ☐ Where appropriate, use test base classes to define structure and behavior that is common across a set of tests, and create individual tests by extending these base classes. |
Moving common code into a base class is an example of good object-oriented programming practice, but it is the principle of planning for reuse that is the most important thing. Remember to call the super. <phase_name>_phase method from any standard phase methods (see Components).
| ☐ For reuse, avoid making tests dependent on the specific details of the verification environment. |
For example, avoid introducing hierarchical object references that point deep into the verification environment. When referencing components from the test, use uvm_top.find("*.path") to locate components within the verification environment rather than using full "hardwired" object references, but note that the find method can be expensive in terms of CPU time (so do not call it from an inner loop).
| ☐ Use the command line processor to modify the behavior of tests without the need for recompilation. |
For example, select the test with the +UVM_TESTNAME command line argument and start the test by calling run_test with no arguments:
uvm_top.run_test();
You can also use the command line processor to set factory overrides, set values in the configuration database, and set the verbosity level, all without any need to re-compile the SystemVerilog source code.
Messaging
| ☐ To report a message, always use one of the eight standard report macros `uvm_info, `uvm_info_context, and so forth, rather than ad hoc $display statements or similar. |
File I/O from a simulation environment can often dominate simulation run time, so it is important to use the reporting features of UVM, such as message verbosity, to control the number of messages generated.
| ☐ Set the message id either to a static string or to get_type_name(). |
The message id is the first argument to report macros such as `uvm_info, `uvm_warning, and so forth. Set it to a static string in cases where that string is made common to all the reports in the current VIP and thus helps identify the report as originating from that VIP. Otherwise set it to get_type_name(), which returns a string that represents the type of the current class. Note that get_type_name() may be useful during the original development and debug of VIP, but may not be so appropriate within VIP that is to be widely deployed. get_type_name() is in any case a good fallback if there is no other obvious choice.
| ☐ Set message verbosity levels thoughtfully, methodically, and consistently throughout the code to avoid unnecessary data in the simulation log file and to differentiate between messages intended for use during the development and debug of the verification environment itself and messages intended for use when running tests and debugging the DUT. |
| ☐ By default, set the verbosity level of each message to a high number such that the message is less likely to be reported, rather than to a low number such that the message is always reported. |
The following verbosity levels are recommended:
UVM_HIGH and UVM_DEBUG - messages used to debug the verification environment or tests themselves, typically suppressed once the verification environment or tests are able to reach the start of the run phase successfully.
UVM_MEDIUM - messages related to the execution of sequences or pin-level behaviour, typically generated during the run phase and used to help diagnose errors in the DUT
UVM_NONE - messages never suppressed by the verbosity mechanism, so only to be used infrequently to relay information that is always significant, such as major phase or state changes during test execution
It can be useful to set the verbosity level for a particular test from the simulator command line using the command line argument +UVM_VERBOSITY
| ☐ Set message severity levels thoughtfully to differentiate between messages that are purely informational, messages that may represent errors, and messages that are certainly errors. |
The following severity levels are recommended:
UVM_INFO - message is for information only and does not indicate an error.
UVM_WARNING - the message indicates a potential error that requires further investigation
UVM_ERROR - the message indicates a real error, but simulation is allowed to proceed. Use when it may be possible to gather further information about the origin of the error by allowing simulation to continue for a while longer. By default, UVM_ERROR is associated with the quit count, which aborts simulation when a maximum error count is reached.
UVM_FATAL - the message indicates an error of such severity that the simulation should not be allowed to continue
Register Layer
| ☐ If you use a generator to create the SystemVerilog code for the register model, do not modify the generated code. |
You should use a generator to create the register model because doing so is much more productive than typing in the register model by hand. But you need to be aware that any edits you make to the generated files will be lost if the register model is re-generated, so you should avoid making any such edits.
| ☐ The top-level UVM environment should instantiate the register block using the factory and should call the build method of the register model. |
The factory method call type_id::create and the call to build should be made from the build_phase method of the environment.
| ☐ In the case of a hierarchically organized UVM environment where child environments use register models, there should be a single top-level register block that instantiates the register blocks associated with the child environments, and so on down the hierarchy. |
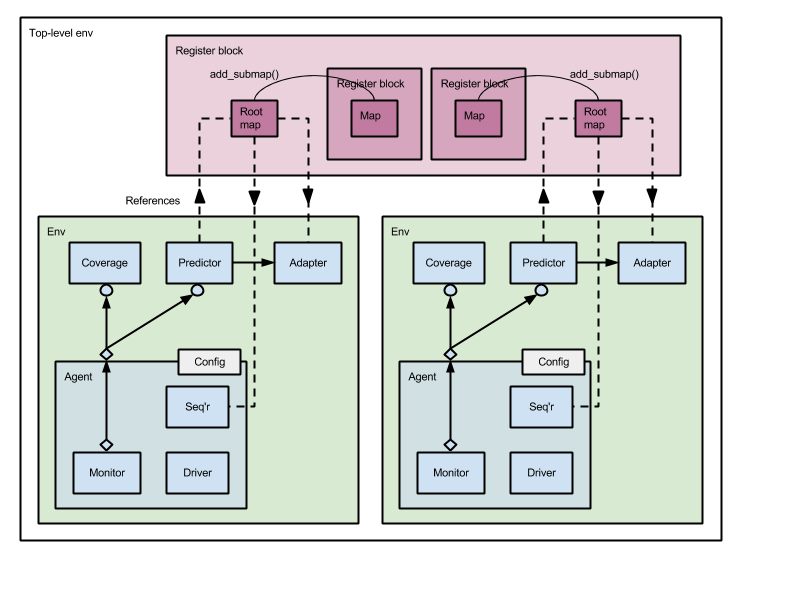
Figure: Connecting the Register Layer
| ☐ Any UVM environment that uses a register model should have a variable named regmodel that stores a reference to the register block for that specific environment. |
| ☐ A UVM environment that has a register model should set the regmodel variable of any child component that also uses a register model to the corresponding sub-block of its register block. |
The regmodel variable of the child should be set from the build_phase method of the parent.
| ☐ A UVM environment should only instantiate a register block if the value of the environment's regmodel variable is null. |
For a top-level environment the value of regmodel will be null, so the environment should instantiate the register block and set the value of regmodel. For a lower-level environment the value of regmodel should not be null because it should have been set by a higher-level environment. This mechanism allows the same environment to be instantiated either as a top-level environment (with a register model) or as a lower-level environment (with no register model of its own).
Example:
top_reg_block regmodel;

function void top_env::build_phase(uvm_phase phase);
  if (regmodel == null)
  begin
    // Instantiate register model for top-level env
    regmodel = top_reg_block::type_id::create("regmodel");
    regmodel = build();
  end
  // Set regmodel variable of lower-level env through config object
  m_bus_env_cfg = new("m_bus_env_cfg");
 m_bus_env_cfg.regmodel = regmodel.bus;
  ...
endfunction
| ☐ The variable name and the UVM instance name of each child register block in the register model itself should correspond to the name of the associated agent. |
For example, for an agent named bus, the instance of the register block associated with the environment that instantiates that agent (bus_reg_block below) should have the variable name bus in the register model and should have the UVM instance name "bus". The top-level register block (top_reg_block below) will need to have one or more an address maps (bus_map below) that subsume the address maps of the child register blocks (bus.bus_map below).
Example:
// Top-level register block
class top_reg_block extends uvm_reg_block;
  `uvm_object_utils(top_reg_block)

  bus_reg_block bus; // Child register block for an agent named bus
  uvm_reg_map   bus_map;

  function new(string name = "");
    super.new(name, UVM_NO_COVERAGE);
  endfunction

  virtual function void build;
    bus = bus_reg_block::type_id::create("bus");
    bus.configure(this);
    bus.build();

    bus_map     = create_map("bus_map", 'h0, 1, UVM_LITTLE_ENDIAN);
    default_map = bus_map;
    bus_map.add_submap(bus.bus_map, 'h0);
   lock_model();
  endfunction
  ...
| ☐ A register block should only model DUT registers that are accessible by the UVM sequences associated with the immediately enclosing UVM environment. |
The register model should be structured as a set of hierarchically nested register blocks that reflect the hierarchy of the DUT in such a way that individual register blocks can be reused at the block, subsystem, or full chip level. (See Figure.)
| ☐ A UVM environment that uses a register model and that instantiates an agent should instantiate and connect a register adapter and a register predictor for that agent. |
The register adapter and predictor should be instantiated in the build_phase method and should be connected in the connect_phase method of the environment. The adapter should be connected to the sequencer and the predictor to the monitor of the agent. (See Figure.)
| ☐ A register model should use explicit prediction to keep its mirror values synchronized with the register values in the DUT. |
Explicit prediction requires that you connect the analysis port of the monitor in the agent to a UVM register predictor, thereby allowing the mirror values in the register model to be updated every time there is relevant activity on the DUT interface regardless of whether or not that activity was initiated through the register layer. The predictor component should be instantiated in the same environment as the agent, and the address map associated with the predictor should have auto-prediction turned off by calling its set_auto_predict method with an argument value of 0.
| ☐ The address map variable .map of the predictor in each child register block should be assigned to refer to the corresponding address map of the top-level register block. |
This ensures that registers are accessed using their global address in the system address map rather than an offset in a local address map.
Example:
// To connect the register layer to an agent named bus
bus_agent       m_bus_agent;
bus_reg_block   regmodel;
reg2bus_adapter m_reg2bus;
uvm_reg_predictor #(bus_tx) m_bus2reg_predictor;

function void bus_env::build_phase(uvm_phase phase);
  ...
  m_bus_agent = bus_agent      ::type_id::create("m_bus_agent", this);
  m_reg2bus   = reg2bus_adapter::type_id::create("m_reg2bus", this);
  m_bus2reg_predictor =
    uvm_reg_predictor #(bus_tx)::type_id::create("m_bus2reg_predictor", this);
endfunction

function void top_env::connect_phase(uvm_phase phase);
  if (regmodel.get_parent() == null)
    regmodel.default_map.set_sequence(m_bus_agent.m_sequencer, m_reg2bus);
  m_bus2reg_predictor.map     = regmodel.bus_map;
  m_bus2reg_predictor.adapter = m_reg2bus;
  regmodel.bus_map.set_auto_predict(0);
  m_bus_agent.m_monitor.ap.connect( m_bus2reg_predictor.bus_in );
endfunction
During the development of the verification environment it might be helpful to print out details of the registers in the register model for debug purposes. This should be done from the end_of_elaboration_phase method.
Example:
function void end_of_elaboration_phase(uvm_phase phase);
  uvm_reg regs[$];
  string name;
  regmodel.bus_map.get_registers(regs);
  `uvm_info(get_type_name(),
    $sformatf("Found %d registers", regs.size()), UVM_MEDIUM)
  for (int j = 0; j < regs.size(); j++)
    `uvm_info(get_type_name(),
       $sformatf("regs[%0d]: %s", j, regs[j].get_name()), UVM_HIGH)
endfunction
| ☐ A register sequence that reads or write registers in a register model should extend uvm_sequence and should have a variable named regmodel that stores a reference to the corresponding register block. |
Example:
class my_reg_sequence extends uvm_sequence;
  `uvm_object_utils(my_reg_sequence)

  bus_reg_block  regmodel;

  task body;
    uvm_reg_data_t  data;
    uvm_status_e    status;

    regmodel.reg0.write(status, .value('hab), .parent(this));
    assert (status == UVM_IS_OK);

    regmodel.reg0.read(status, .value(data), .parent(this));
    assert (status == UVM_IS_OK);
   assert (data === 'hab);
 endtask
endclass
| ☐ Before starting a sequence that reads or writes registers, set the regmodel variable of that sequence. |
Example:
// Starting a register sequence
my_reg_sequence vseq;
vseq = my_reg_sequence::type_id::create("vseq");
vseq.randomize();
vseq.regmodel = regmodel;
vseq.set_starting_phase(phase);
vseq.start(null);
Functional Coverage
For a general discussion of coverage-driven verification in UVM, see Coverage-Driven Verification Methodology.
| ☐ Collect functional coverage in the UVM verification environment using the SystemVerilog covergroup construct. |
It is sometimes necessary or more convenient to process or transform the values coming from the DUT to create derived values that are actually sampled as coverpoints. For example, you might calculate the difference between two addresses that appear consecutively on a bus and use the resulting value as a coverpoint. This technique can overcome the fundamental limitation that covergroups are defined at instantiation time and the definitions of the coverpoints cannot change dynamically.
Example:
class my_agent_coverage extends uvm_subscriber #(bus_tx);
  `uvm_component_utils(my_agent_coverage)

  bus_tx m_item;
  int    m_address_delta;

  covergroup m_cov;
    cp_address_delta: coverpoint m_address_delta {
      bins zero = {0};
      bins one  = {1};
      bins negative = { [-128:-1] };
      bins positive = { [1: 127] };
      option.at_least = 16;
    }
  endgroup

  function new(string name, uvm_component parent);
    super.new(name, parent);
    m_cov = new;
  endfunction : new

  function void write(input bus_tx t);
    m_item = t;
    m_address_delta = m_item.current_address - m_item.previous_address;
    m_cov.sample();
 endfunction : write

endclass : my_agent_coverage
| ☐ Where appropriate, collect functional coverage information in SystemVerilog interfaces using the cover property statement. |
Property-based coverage using the cover property statement can be a good way to collect functional coverage information for temporal sequences in interface protocols (as opposed to sample-based coverage using the covergroup statement), but note that the cover property statement cannot be used within a class-based environment. (See Concurrent assertions)
| ☐ Either place a covergroup in a class as an embedded covergroup or place a covergroup in a package and parameterize the covergroup so that it can be instantiated from classes in that package. |
The embedded covergroup is the most straightforward way to use a covergroup in a class, but several classes can reuse the same covergroup by placing the covergroup declaration in a package outside of any class and having the classes instantiate the covergroup with appropriate parameters.
| ☐ Covergroups should be instantiated within UVM component classes as opposed to within transaction or sequence classes. |
Coverage should be collected from quasi-static objects that endure throughout the simulation, not from objects that come-and-go dynamically over time.
| ☐ Covergroups should be instantiated within UVM subscribers or scoreboards that are themselves instantiated within a UVM environment class and are connected to the analysis ports of monitors/agents. |
Use monitors to gather and assemble information in the form of transactions that are sent out through their analysis ports, but do not place covergroups inside the monitors themselves. This separation between data gathering in the monitor and data analysis in the subscriber/scoreboard is important for reuse.
| ☐ Instantiate the covergroup in the constructor of the coverage collector class. |
It is a SystemVerilog rule that embedded covergroups must be instantiated from the constructor. This goes against the general rule in UVM of keeping the constructor empty and creating sub-objects from the build_phase method.
| ☐ In order to collect functional coverage information for internal signals within the DUT, encapsulate references to hierarchical paths to the DUT in a single SystemVerilog module (or interface), then access that module from the UVM environment using a virtual interface and SystemVerilog interface in the usual way. |
Internal signals within the DUT can be accessed using SystemVerilog hierarchical references or using the bind statement. Encapsulating all hierarchical references within a single module (or interface) allows the verification environment to be kept clean.
| ☐ Where coverage collection spans multiple DUT interfaces and thus depends on analysis transactions received from more than one agent, use the `uvm_analysis_imp_decl macro to provide multiple analysis exports in the coverage collector class. |
The uvm_subscriber class only has a single analysis export. The `uvm_analysis_imp_decl macro offers the most convenient way to write a subscriber class that accepts multiple incoming transaction streams, each with their own distinct write method.
Example:
`uvm_analysis_imp_decl(_expected)
`uvm_analysis_imp_decl(_actual)

class my_cov_collector extends uvm_scoreboard;
  `uvm_component_utils(my_cov_collector)

  uvm_analysis_imp_expected #(tx_t, my_cov_collector) expected_export;
  uvm_analysis_imp_actual   #(tx_t, my_cov_collector) actual_export;

  ...
  function void build_phase(uvm_phase phase);
    expected_export = new("expected_export", this);
    actual_export   = new("actual_export", this);
  endfunction
  ...
  function void write_expected(tx_t t);
    ...
  endfunction

  function void write_actual(tx_t t);
 ...
  endfunction
  ...
| ☐ Group coverpoints into multiple covergroups in order to separate coverage of specification features from coverage of implementation features. |
Keeping specification coverage separate from implementation coverage will help at the point when the coverage model is re-used.
| ☐ Use a variable coverage_enable within the configuration object of the coverage collector to enable or disable coverage collection. |
Coverage collection incurs a performance and memory cost, and some use cases for the verification component may not require coverage collection. The UVM User Guide recommends the use of a variable named coverage_enable for this purpose.
| ☐ Sample covergroups by calling their sample method as opposed to specifying a clocking event for the covergroup. |
This can be the built-in sample method or an overridden sample method with a list of arguments, i.e. covergroup IDENTIFIER with function sample(...). Calling the sample method allows values to be sampled when and only when transactions arrive at the coverage collection component from the DUT.
| ☐ Do not sample covergroups more frequently than necessary. Consider using a conditional expression iff (expression) with each coverpoint to reduce the sampling frequency. |
Sampling too often will unnecessarily inflate the volume of coverage data that needs to be stored and analyzed. It might not be necessary or meaningful to sample each coverpoint every time the covergroup is sampled. Any conditional expression should be kept simple: complex iff conditions can be hard to debug.
| ☐ Sample values within the DUT or at the outputs of the DUT. Do not sample the stimulus applied to the inputs of the DUT. Sample DUT registers when the register value is changed by the DUT, not when it is changed directly by the stimulus. |
Sampling stimulus does not tell you anything about the behavior of the DUT itself, only about the behavior of the stimulus generator.
| ☐ Consider setting the option.at_least of each covergroup and coverpoint to some value other than the default value of 1. |
The default value of option.at_least only ensures that each state is hit once, which in general is insufficient to test whether or not the state has become deadlocked.
| ☐ Do not set option.weight or option.goal of a covergroup or coverpoint. |
There are two potential problems. First, the methodological problem that giving a greater or lesser weight to certain states might distort the coverage reporting, and second, the practical problem that these options are not implemented consistently across simulators.
| ☐ Design coverpoint bins carefully to ensure that functionally significant cases are covered. |
Since 100% coverage of the state space is unrealistic, careful design of coverage bins can be critical to verification quality. Part of the solution can be to create separate bins for typical values, special values, and boundary conditions. The choice of bins should relate back to the verification plan.
| ☐ When designing coverpoints, specify any illegal values or values to be excluded for coverage as ignore_bins. Do not use illegal_bins. |
Covergroups should be confined to collecting functional coverage information and not linked directly to error reporting. Illegal values should be trapped either using assertions or using the UVM report handler.