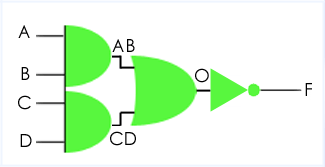
The module shown on the “Modules” page was simple enough to describe using a continuous assignment where the output was a function of the inputs. Usually, modules are more complex than this, and internal connections are required. To make a continuous assignment to an internal signal, the signal must first be declared as a wire.
A Verilog wire represents an electrical connection.

Verilog: Internal signals of an AOI gate module
// Verilog code for AND-OR-INVERT gate
module AOI (input A, B, C, D, output F);
  wire F;  // the default
  wire AB, CD, O;  // necessary

  assign AB = A & B;
  assign CD = C & D;
  assign O = AB | CD;
  assign F = ~O;
endmodule
// end of Verilog code
OK, that's the code. Let's examine it a little more closely...
Wire Declarations
wire AB, CD, O;
This is the syntax for a wire declaration. A wire declaration looks like a Verilog-1995 style port declaration, with a type (wire), an optional vector width and a name or list of names. You can create separate wire declarations if you wish, for example:
wire AB, CD;
wire O;
is an alternative way of creating wire declarations.
Note that ports default to being wires, so the definition of wire F in the Verilog code is optional.
Continuous Assignments
assign AB = A & B;
assign CD = C & D;
assign O = AB | CD;
assign F = ~O;
In this module body, there are four continuous assignment statements. These statements are independent and executed concurrently. They are not necessarily executed in the order in which they are written. This does not affect the functionality of the design. Suppose assign AB = A & B; changes value. This causes B to be evaluated. If AB changes as a result then assign O = AB | CD; is evaluated. If O changes value then assign F = ~O; will be evaluated; possibly the output of the module will change due to a change on B.
Prev Next


